Difference between revisions of "Category:HamsterProKit"
From cogniteam
(→2. Run installation script) |
|||
| (59 intermediate revisions by 2 users not shown) | |||
| Line 3: | Line 3: | ||
[[File:Charger_LLC_Battery_rev2.jpg|800px]] | [[File:Charger_LLC_Battery_rev2.jpg|800px]] | ||
[[File:ProKitLLC.png|600px]] | [[File:ProKitLLC.png|600px]] | ||
| + | == Landing page == | ||
| + | * [https://up-board.org/up-squared-robomaker-pro-kit/] | ||
| + | |||
| + | ==3rd party things need to know to work with kit== | ||
| + | |||
| + | * ROS general information: [http://wiki.ros.org/ROS/Introduction WHAT IS ROS] | ||
| + | |||
| + | * ROS2 general information: [https://index.ros.org/doc/ros2/ ROS2] | ||
| + | |||
| + | * RVIZ - instrument for visualization: [http://wiki.ros.org/rviz/UserGuide RVIZ] | ||
== Kit prerequisite (not included in the kit) == | == Kit prerequisite (not included in the kit) == | ||
| Line 8: | Line 18: | ||
* Battery charger | * Battery charger | ||
| − | == Connecting the kit == | + | ===1. Connecting all parts within the kit === |
* Use the LLC cable (in the picture) to both monitor and charge the battery | * Use the LLC cable (in the picture) to both monitor and charge the battery | ||
| − | * Port | + | * Port 8 can be used to charge the Lipo Battery |
| − | * Port | + | * Port 9 should connect the the Lipo battery balancer (JST connector) |
* Port 7 should connect to the LLC board | * Port 7 should connect to the LLC board | ||
* Red T connector (rightmost on the picture) | * Red T connector (rightmost on the picture) | ||
| Line 22: | Line 32: | ||
* Connect the D435i camera to a USB3 Port using the cable | * Connect the D435i camera to a USB3 Port using the cable | ||
| − | + | '''Note: Camera D435i must be already updated with latest firmware and have calibrated IMU. Visit official site for more information.''' | |
| − | |||
| − | |||
| − | |||
| − | |||
| − | |||
| − | |||
| − | |||
| − | |||
| − | |||
| − | |||
| − | |||
| − | |||
| − | + | ===2. Run installation script === | |
| − | + | Internet connection requires | |
| − | + | <code>sudo wget https://cloud.cogni.io/index.php/s/9Lde7aBNHfyQM6K/download -O - | sudo bash</code> | |
| − | + | Reboot board after installation. | |
| − | + | ===3. Configure ROS IP === | |
| − | + | Configure IP for ROS applications: | |
| − | / | + | <code>pico hamster.config</code> in home directory |
| − | + | Edit row with your board IP: | |
| − | / | + | <code>export HAMSTER_IP=your_IP</code> |
| − | + | ===4. Launch examples === | |
| − | + | '''NOTE: examples work properly just with full-connected kit, be sure you did step 1 from this page.''' | |
| − | + | To run examples in ROS run command: | |
| − | + | <code>ros_prokit</code> | |
| − | + | [https://wiki.cogni.io/Category:HamsterProKit/RosExample ROS_EXAMPLES] | |
| − | + | To run example in ROS2 run command: | |
| − | <code> | + | <code>ros2_prokit</code> |
| − | + | [https://wiki.cogni.io/Category:HamsterProKit/Ros2Example ROS2_EXAMPLES] | |
| − | |||
Latest revision as of 14:15, 6 December 2021
Contents
AAEON Pro Kit support page
Landing page
3rd party things need to know to work with kit
- ROS general information: WHAT IS ROS
- ROS2 general information: ROS2
- RVIZ - instrument for visualization: RVIZ
Kit prerequisite (not included in the kit)
- Lipo battery with T connector 7.4V 2 cell.
- Battery charger
1. Connecting all parts within the kit
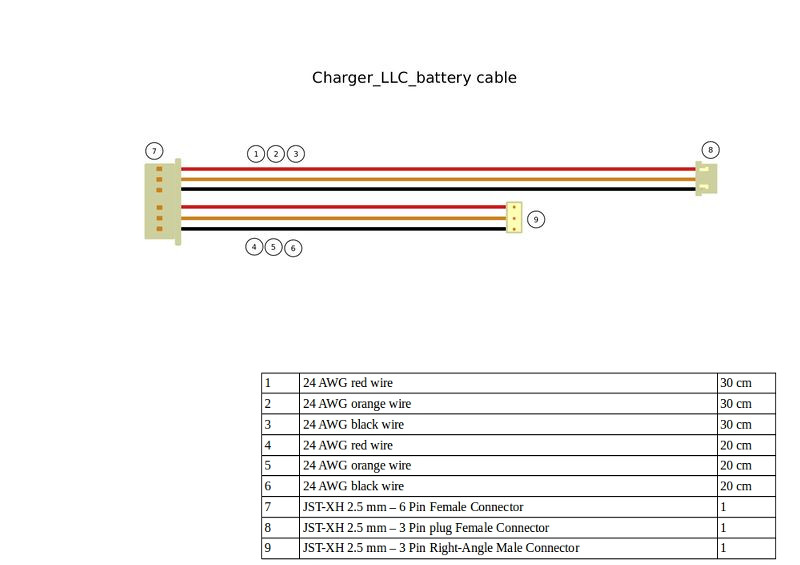
- Use the LLC cable (in the picture) to both monitor and charge the battery
 * Port 8 can be used to charge the Lipo Battery
 * Port 9 should connect the the Lipo battery balancer (JST connector)
 * Port 7 should connect to the LLC board
 * Red T connector (rightmost on the picture)
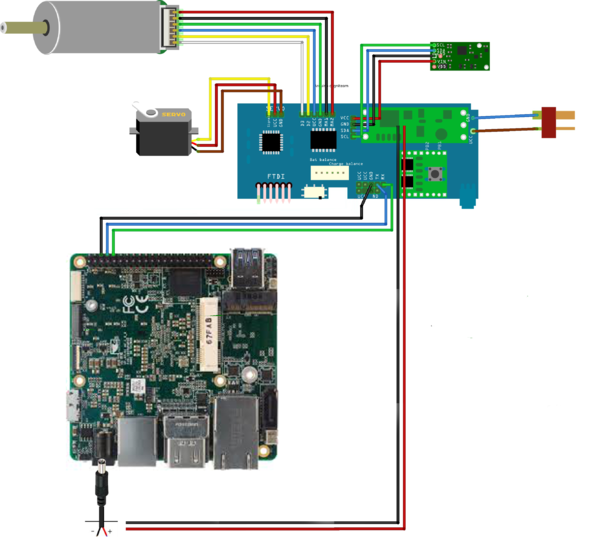
- Connect the Up Squared board to the LLC as shown in the picture
 * TX/RX should be connected to GPIO ports
 * Power should be connected through DC connector
- Connect the MX2 wifi module
- Connect the two WIFI antennas using the SMT connector to the integrated chip
- Connect the Movidius chip using the PCI connector
- Connect the D435i camera to a USB3 Port using the cable
Note: Camera D435i must be already updated with latest firmware and have calibrated IMU. Visit official site for more information.
2. Run installation script
Internet connection requires
sudo wget https://cloud.cogni.io/index.php/s/9Lde7aBNHfyQM6K/download -O - | sudo bash
Reboot board after installation.
3. Configure ROS IP
Configure IP for ROS applications:
pico hamster.config in home directory
Edit row with your board IP:
export HAMSTER_IP=your_IP
4. Launch examples
NOTE: examples work properly just with full-connected kit, be sure you did step 1 from this page.
To run examples in ROS run command:
ros_prokit
To run example in ROS2 run command:
ros2_prokit
Subcategories
This category has the following 4 subcategories, out of 4 total.

