Difference between revisions of "PowerAndBattery"
From cogniteam
| (12 intermediate revisions by 2 users not shown) | |||
| Line 1: | Line 1: | ||
| − | {{DISPLAYTITLE:Power and battery}} | + | {{DISPLAYTITLE:Power and charging the battery}} |
[[Category:HamsterV5]] | [[Category:HamsterV5]] | ||
| + | [[Category:HamsterV6]] | ||
| + | [[Category:HamsterV7]] | ||
| + | [[Category:HamsterV7N]] | ||
| + | [[Category:HamsterV7I]] | ||
[[File:HamsterV5Battery.png|400px]] | [[File:HamsterV5Battery.png|400px]] | ||
| Line 19: | Line 23: | ||
</gallery> | </gallery> | ||
| − | === | + | === Functionality === |
| − | * The power switch is the main power relay. It cuts off all power and enables to charge the Hamster. | + | * The power switch is the main power relay. It cuts off all power and enables to charge the Hamster. When in position facing rear wheel all power if off, and the battery will not drain. |
* The toggle button is in charge of the power monitor and lipo battery management. | * The toggle button is in charge of the power monitor and lipo battery management. | ||
| − | In case the Hamster battery level drops, it will automatically switch off all power to protect the battery. For long storage it is better to switch off all power using the | + | In case the Hamster battery level drops, it will automatically switch off all power to protect the battery. |
| − | During normal daily use there is no problem to use only the toggle button to switch on and off the Hamster. | + | * For long storage it is better to switch off all power using the power switch. |
| + | * During normal daily use there is no problem to use only the toggle button to switch on and off the Hamster. | ||
== Hamster charging == | == Hamster charging == | ||
| − | The Hamster can be charged only when the | + | * The Hamster can be charged only when the power switch is in it’s OFF state (switch toggled towards the rear wheel). |
| − | + | * Charging is done through the JST connector at the rear part of the robot, No need to take out the batteries or open the robot | |
| + | * When the battery is charging 2 lights should turn red on the charger (light Cell1 and Cell2) | ||
| + | * When battery is full all light should turn green | ||
| + | |||
| + | <gallery> | ||
| + | File:JST.jpg|200px|JST connector | ||
| + | File:li-po-battery-balance-charger-a3-2s-3s-ac-input-uk-plug-himoto-a3uk-1083-p.jpeg|200px|Charger | ||
| + | File:li-po-battery-balance-charger-a3-2s-3s-ac-input-uk-plug-himoto-a3uk-1083-p-closeup.jpeg|200px|Lights | ||
| + | </gallery> | ||
Latest revision as of 12:03, 5 January 2021

Lipo battery
The Hamster robot is shipped with powerful LIPO batteries which are fast to charge and provide plenty of power needed for the platform operation over long periods and with demanding sensors.
Double switch mechanism
The use of LIPO batteries however requires special attention in order to prevent the discharge of the batteries (since once LIPO batteries are fully discharged they cannot be re-charged again). Hence, the Hamster robot arrives with a double switch mechanism. They are refereed as:
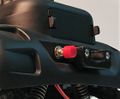
- Power switch - located at the lower part of the Hamster near the rear wheel
- Toggle button - located near the battery compartment

Power switch
Toggle button


Functionality
- The power switch is the main power relay. It cuts off all power and enables to charge the Hamster. When in position facing rear wheel all power if off, and the battery will not drain.
- The toggle button is in charge of the power monitor and lipo battery management.
In case the Hamster battery level drops, it will automatically switch off all power to protect the battery.
- For long storage it is better to switch off all power using the power switch.
- During normal daily use there is no problem to use only the toggle button to switch on and off the Hamster.
Hamster charging
- The Hamster can be charged only when the power switch is in it’s OFF state (switch toggled towards the rear wheel).
- Charging is done through the JST connector at the rear part of the robot, No need to take out the batteries or open the robot
- When the battery is charging 2 lights should turn red on the charger (light Cell1 and Cell2)
- When battery is full all light should turn green
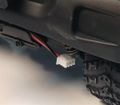
JST connector
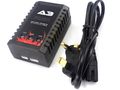
Charger
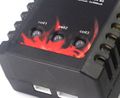
Lights


