Difference between revisions of "HamsterOCUAndroidApp"
| (31 intermediate revisions by 3 users not shown) | |||
| Line 1: | Line 1: | ||
{{DISPLAYTITLE:Hamster Simulation}} | {{DISPLAYTITLE:Hamster Simulation}} | ||
| + | [[Category:HamsterV7N]] | ||
| + | [[Category:HamsterV7I]] | ||
[[Category:Hamster]] | [[Category:Hamster]] | ||
| + | |||
=== HamsterOCU APP === | === HamsterOCU APP === | ||
| + | == Download== | ||
| + | [https://cloud.cogni.io/index.php/s/Rf1z5OreRnfQ3Dx | APK download for android] | ||
| + | == Usage == | ||
Communicate and control Cogniteam's Hamster robots. | Communicate and control Cogniteam's Hamster robots. | ||
Use the virtual joystick to move the robot around, while receiving image in real-time. | Use the virtual joystick to move the robot around, while receiving image in real-time. | ||
Create a map for localization using map mode. | Create a map for localization using map mode. | ||
| + | <br /> | ||
| + | [[File:menu1.png|400px]] | ||
== Installation == | == Installation == | ||
| Line 17: | Line 25: | ||
'''In order to control a Hamster via the App you will need 2 things:''' | '''In order to control a Hamster via the App you will need 2 things:''' | ||
| − | * [ | + | * [http://wiki.cogni.io/index.php/ConfigNetwork Connect the Hamster robot to a server.] |
* Connect the app to the same server and configure the Hamster details. | * Connect the app to the same server and configure the Hamster details. | ||
| − | When loading the app the first screen will be: | + | '''When loading the app the first screen will be:''' <br /> |
| + | Make sure to enter the correct IP and Port number.<br /> | ||
| + | In case <strong>multi-master configuration</strong> - robot IP and master IP the same.<br /> | ||
| + | Example: to connect agent6 should enter as master uri: http://10.0.2.6:11311 | ||
| + | <br /> | ||
[[File:login.png|400px]] | [[File:login.png|400px]] | ||
| + | |||
| + | <br /> | ||
| + | <br /> | ||
| + | |||
| + | The second step would be configuring the Hamster details in the settings tab.<br /> | ||
| + | Note: if your Connected Hamster has the default settings as the App then you will be able to immediately control the Hamster.<br /> | ||
| + | '''For a quick setup just change the namespace 'agent1' to the agent_id of your connected Hamster.''' | ||
| + | <br /> | ||
| + | <br /> | ||
| + | |||
| + | [[File:settings1.png|400px]] | ||
| + | <br /><br /> | ||
| + | [[File:settings2.png|400px]] | ||
| + | |||
| + | <br /> | ||
| + | |||
| + | == Pose Estimation == | ||
| + | <br /> | ||
| + | Pose Estimation is basically the [https://en.wikipedia.org/wiki/Robotic_mapping Localization] of the Hamster.<br /> | ||
| + | The goal for an autonomous robot is to be able to construct (or use) a map or floor plan and to localize itself in it. <br /> | ||
| + | |||
| + | When starting the app you will need to Pose Estimation.<br /> | ||
| + | |||
| + | '''Example before Localization:<br />''' | ||
| + | To localize the Hamster you will need to press the area on the map where the Hamster actually is.<br /> | ||
| + | Then, a Blue arrow will appear, point it to the direction where the Hamster's front is pointing. | ||
| + | <br /> | ||
| + | [[File:badLocal.png|400px]] | ||
| + | |||
| + | <br /> | ||
| + | |||
| + | '''Example after Localization:<br />''' | ||
| + | [[File:goodLocal.png|400px]]<br /> | ||
| + | |||
| + | |||
| + | |||
| + | <br /> | ||
| + | '''Note:''' You might need to repeat the process few times to get the correct position. | ||
| + | <br /> | ||
| + | |||
| + | == Autonomous Mode == | ||
| + | <br /> | ||
| + | Autonomous Mode will make the Hamster drive around autonomously and avoid obstacles.<br /> | ||
| + | You may use Autonomous Mode combined with Mapping mode and let the Hamster build the map, or most of it.<br /> | ||
| + | Then, you can adjust manually via the joystick the 'Dead spots' that the vehicle have missed.<br /> | ||
| + | <br /> | ||
| + | |||
| + | == Mapping Mode == | ||
| + | <br /> | ||
| + | Mapping Mode is used to create the map of the Hamster that is seen on the screen. | ||
| + | |||
| + | <br /> | ||
| + | [[File:mapping.png|400px]] | ||
| + | |||
| + | == Set Goal == | ||
| + | <br /> | ||
| + | Set a local goal on the map simply by clicking on it (inside the 'Set Goal' tab) and see the Hamster drive there.<br /> | ||
| + | |||
| + | '''Click on the screen and choose the goal:''' | ||
| + | <br /> | ||
| + | [[File:setGoal1.png|400px]] | ||
| + | <br /> | ||
| + | '''The Hamter will drive to the green destination arrow.''' | ||
| + | <br /> | ||
| + | [[File:setGoal2.png|400px]] | ||
Latest revision as of 15:24, 5 January 2021
Contents
HamsterOCU APP
Download
Usage
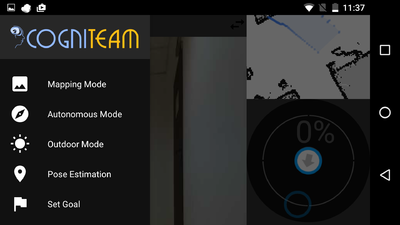
Communicate and control Cogniteam's Hamster robots.
Use the virtual joystick to move the robot around, while receiving image in real-time.
Create a map for localization using map mode.
Installation
Available on Google Play Store: Download the app Compatible with Android 'Ice Cream Sandwich 4.0 – 4.0.4' version and higher.
Connecting a Hamster
In order to control a Hamster via the App you will need 2 things:
- Connect the Hamster robot to a server.
- Connect the app to the same server and configure the Hamster details.
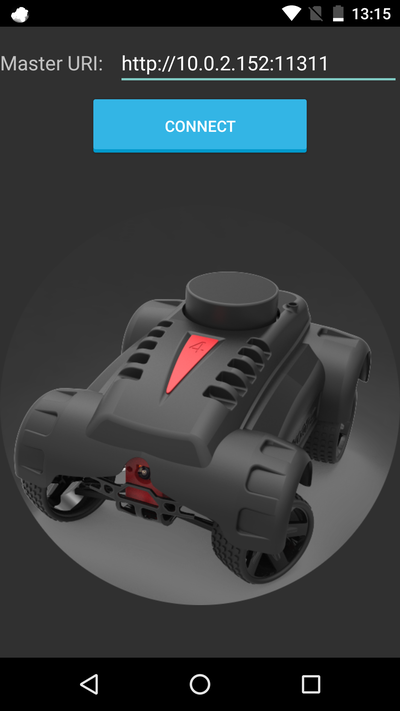
When loading the app the first screen will be:
Make sure to enter the correct IP and Port number.
In case multi-master configuration - robot IP and master IP the same.
Example: to connect agent6 should enter as master uri: http://10.0.2.6:11311
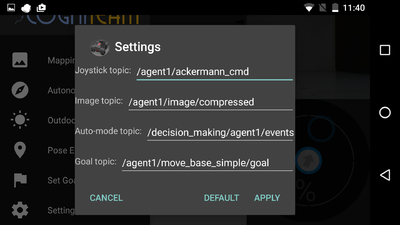
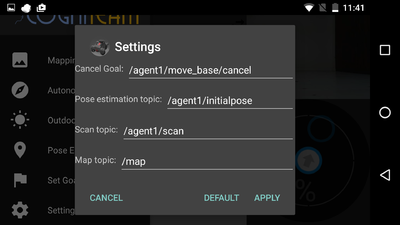
The second step would be configuring the Hamster details in the settings tab.
Note: if your Connected Hamster has the default settings as the App then you will be able to immediately control the Hamster.
For a quick setup just change the namespace 'agent1' to the agent_id of your connected Hamster.
Pose Estimation
Pose Estimation is basically the Localization of the Hamster.
The goal for an autonomous robot is to be able to construct (or use) a map or floor plan and to localize itself in it.
When starting the app you will need to Pose Estimation.
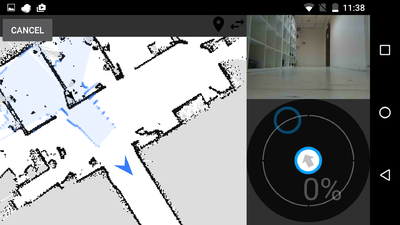
Example before Localization:
To localize the Hamster you will need to press the area on the map where the Hamster actually is.
Then, a Blue arrow will appear, point it to the direction where the Hamster's front is pointing.
Note: You might need to repeat the process few times to get the correct position.
Autonomous Mode
Autonomous Mode will make the Hamster drive around autonomously and avoid obstacles.
You may use Autonomous Mode combined with Mapping mode and let the Hamster build the map, or most of it.
Then, you can adjust manually via the joystick the 'Dead spots' that the vehicle have missed.
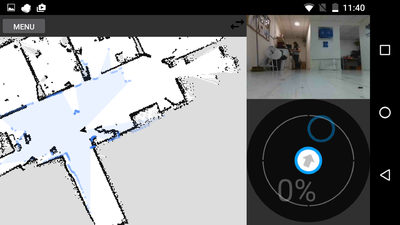
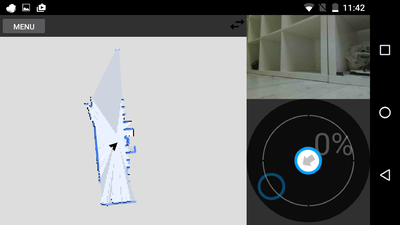
Mapping Mode
Mapping Mode is used to create the map of the Hamster that is seen on the screen.
Set Goal
Set a local goal on the map simply by clicking on it (inside the 'Set Goal' tab) and see the Hamster drive there.
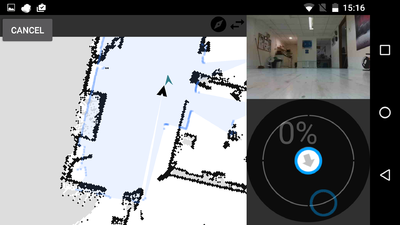
Click on the screen and choose the goal:
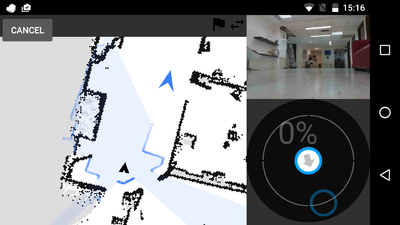
The Hamter will drive to the green destination arrow.
