Difference between revisions of "Category:Pengo"
m |
|||
| (31 intermediate revisions by 3 users not shown) | |||
| Line 1: | Line 1: | ||
{{DISPLAYTITLE:Pengo}} | {{DISPLAYTITLE:Pengo}} | ||
| + | |||
| + | |||
| + | = Pengo Internal documentation = | ||
| + | * Pengo (internal) documentation can be found here (Password protected) | ||
| + | * [http://cloud.cogni.io/index.php/s/SeR4bpxj7zFbI89 Pengo] | ||
| + | * This effort is now deprecated. New systems are all open sourced. | ||
| + | |||
| + | = Hardware = | ||
| + | * PC Connection: USB or via RX/TX pins on the parallel port | ||
| + | * Motor Overload Detection: disables power on detecting high current (>3A) | ||
| + | * Odometry: 52 ticks/enc rev, 2578.33 ticks/wheel rev, 11.7 ticks/mm | ||
| + | * Gyro: factory calibrated, 1 axis (110 deg/s)Bumpers: left, center, right | ||
| + | * Cliff sensors: left, center, right | ||
| + | * Wheel drop sensor: left, right | ||
| + | * Power connectors: 5V/1A, 12V/1.5A, 12V/5A | ||
| + | * Expansion pins: 3.3V/1A, 5V/1A, 4 x analog in, 4 x digital in, 4 x digital out | ||
| + | * Audio : several programmable beep sequences | ||
| + | * Programmable LED: 2 x two-coloured LED | ||
| + | * State LED: 1 x two coloured | ||
| + | * LED [Green - high, Orange - low, Green & Blinking - charging] | ||
| + | * Buttons: 3 x touch buttons | ||
| + | * Battery: Lithium-Ion, 14.8V, 4400 mAh (4S2P - large) can be doubled | ||
| + | * Firmware upgradeable: via usb | ||
| + | * Sensor Data Rate: 50Hz | ||
| + | * Recharging Adapter: Input: 100-240V AC, 50/60Hz, 1.5A max; Output: 19V DC, 3.16A | ||
| + | * Netbook recharging connector (only enabled when robot is recharging): 19V/2.1A DC | ||
| + | * Docking IR Receiver: left, centre, right | ||
| + | |||
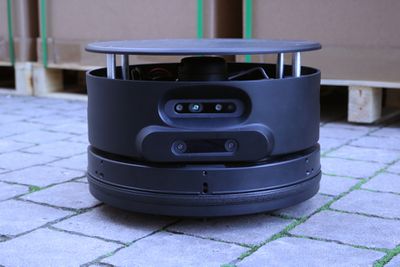
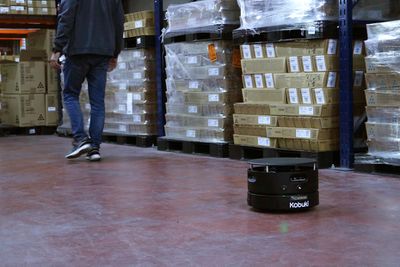
| + | = Pengo Wearhouse Robot = | ||
| + | [[File:pengo-wearhouse.jpg|400px]] [[File:pengo-wearhouse-2.jpg|400px]] | ||
| + | * Up to 4 X 3D cameras D435 or D415 | ||
| + | * Optional T265 for localization in large areas | ||
| + | * 2D Lidar | ||
| + | * Bumper sensor | ||
| + | * Battery monitoring | ||
| + | * Charging base unit | ||
| + | |||
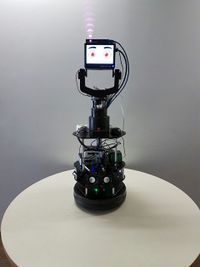
| + | = Pengo Educational Robot = | ||
[[File:WhatsApp Image 2016-11-02 at 11.07.40.jpeg|200px|thumb]] | [[File:WhatsApp Image 2016-11-02 at 11.07.40.jpeg|200px|thumb]] | ||
| − | |||
Pengo includes | Pengo includes | ||
* 3D camera | * 3D camera | ||
| Line 13: | Line 50: | ||
* Screen with animation for HMI, ROS controlled | * Screen with animation for HMI, ROS controlled | ||
| − | == Pengo | + | == Pengo User/Password == |
| − | + | <syntaxhighlight lang="bash" line='line'> | |
| − | + | User: pengo | |
| − | + | Password : pengo | |
| + | </syntaxhighlight> | ||
| − | == | + | == Pengo remote login == |
| − | + | <syntaxhighlight lang="bash" line='line'> | |
| − | + | ssh pengo@pengo_ip | |
| − | + | </syntaxhighlight> | |
| − | + | ||
| − | + | ||
| − | + | == Pengo network Configuration == | |
| − | + | ||
| − | + | ||
| − | + | === Pengo IP configuration === | |
| − | + | Configure static ip: | |
| − | |||
| − | |||
| − | |||
| − | |||
| − | |||
| − | |||
<br> | <br> | ||
| + | <syntaxhighlight lang="bash" line='line'> | ||
| + | sudo nano /etc/network/interfaces | ||
| + | </syntaxhighlight> | ||
| + | Now, paste this under # The primary network interface: | ||
| + | <syntaxhighlight lang="bash" line='line'> | ||
| + | auto lo | ||
| + | iface lo inet loopback | ||
| + | iface ens33 inet static | ||
| + | address xxx.xxx.xxx.xxx(enter your ip here) | ||
| + | netmask xxx.xxx.xxx.xxx(usually, 255.255.255.0) | ||
| + | gateway xxx.xxx.xxx.xxx(enter gateway ip here,usually the address of the router) | ||
| + | dns-nameservers 8.8.8.8 | ||
| + | </syntaxhighlight> | ||
| − | + | ||
| − | + | Restrat networking: | |
| − | + | <br> | |
| − | + | <syntaxhighlight lang="bash" line='line'> | |
| − | + | systemctl restart ifup@eth0 | |
| + | </syntaxhighlight> | ||
| + | |||
| + | At this point you can check if the settings are correct: | ||
| + | <br> | ||
| + | <syntaxhighlight lang="bash" line='line'> | ||
| + | ifconfig | ||
| + | </syntaxhighlight> | ||
| + | === ROS IP configuration === | ||
| + | Run the following commands in the terminal: | ||
| + | <syntaxhighlight lang="bash" line='line'> | ||
| + | cd ~ | ||
| + | pico pengo.config | ||
| + | </syntaxhighlight> | ||
| + | Edit the parameters under ''''User Settings'''' to have the '''same IP''' as from stage 3: | ||
* PENGO_IP= YOUR_STATIC_IP | * PENGO_IP= YOUR_STATIC_IP | ||
* PENGO_ROS_MASTER = YOUR_STATIC_IP | * PENGO_ROS_MASTER = YOUR_STATIC_IP | ||
<br> | <br> | ||
| − | + | Reboot the computer and you're ready. | |
| + | |||
| + | === ROS launch configuration === | ||
| + | Navigate to: | ||
| + | <syntaxhighlight lang="bash" line='line'> | ||
| + | cd ~ | ||
| + | </syntaxhighlight> | ||
| + | Run the launch file: | ||
| + | Note, there is a 15 seconds delay to assure that all of the configurations are done. | ||
| + | <syntaxhighlight lang="bash" line='line'> | ||
| + | . pengo-startup | ||
| + | </syntaxhighlight> | ||
| + | === Pengo ROS topics === | ||
| + | {| class="wikitable" | ||
| + | |- | ||
| + | ! Topic !! Description | ||
| + | |- | ||
| + | | /odom || Wheels controller. | ||
| + | |- | ||
| + | | /scan|| Scanning an area. | ||
| + | |- | ||
| + | |/move_base/goal || Move to a certain target. | ||
| + | |- | ||
| + | |/mobile_base/sensors/imu_data || Data coming from the IMU sensor.Compass, Accelerometer | ||
| + | |- | ||
| + | |/agentN/ackermann_cmd || Velocity command | ||
| + | |- | ||
| + | |/amcl_pose || Absolute position published by AMCL node (localization) | ||
| + | |- | ||
| + | |/agentN/imu || Compass, Accelerometer | ||
| + | |- | ||
| + | |/map || A map used for localization | ||
| + | |} | ||
| + | |||
| + | === Mapping and localization with Pengo === | ||
| + | To control the Pengo you can use Cogniteam's [[HamsterOCUAndroidApp|Android app]]. | ||
Latest revision as of 09:19, 8 April 2021
Contents
Pengo Internal documentation
- Pengo (internal) documentation can be found here (Password protected)
- Pengo
- This effort is now deprecated. New systems are all open sourced.
Hardware
- PC Connection: USB or via RX/TX pins on the parallel port
- Motor Overload Detection: disables power on detecting high current (>3A)
- Odometry: 52 ticks/enc rev, 2578.33 ticks/wheel rev, 11.7 ticks/mm
- Gyro: factory calibrated, 1 axis (110 deg/s)Bumpers: left, center, right
- Cliff sensors: left, center, right
- Wheel drop sensor: left, right
- Power connectors: 5V/1A, 12V/1.5A, 12V/5A
- Expansion pins: 3.3V/1A, 5V/1A, 4 x analog in, 4 x digital in, 4 x digital out
- Audio : several programmable beep sequences
- Programmable LED: 2 x two-coloured LED
- State LED: 1 x two coloured
- LED [Green - high, Orange - low, Green & Blinking - charging]
- Buttons: 3 x touch buttons
- Battery: Lithium-Ion, 14.8V, 4400 mAh (4S2P - large) can be doubled
- Firmware upgradeable: via usb
- Sensor Data Rate: 50Hz
- Recharging Adapter: Input: 100-240V AC, 50/60Hz, 1.5A max; Output: 19V DC, 3.16A
- Netbook recharging connector (only enabled when robot is recharging): 19V/2.1A DC
- Docking IR Receiver: left, centre, right
Pengo Wearhouse Robot
- Up to 4 X 3D cameras D435 or D415
- Optional T265 for localization in large areas
- 2D Lidar
- Bumper sensor
- Battery monitoring
- Charging base unit
Pengo Educational Robot
Pengo includes
- 3D camera
- 2D Lidar
- Speakers
- Lilt unit
- Bumper sensor
- Battery monitoring
- Charging base unit
- 2 Linux servers pre-configured with ROS
- Screen with animation for HMI, ROS controlled
Pengo User/Password
<syntaxhighlight lang="bash" line='line'> User: pengo Password : pengo </syntaxhighlight>
Pengo remote login
<syntaxhighlight lang="bash" line='line'> ssh pengo@pengo_ip </syntaxhighlight>
Pengo network Configuration
Pengo IP configuration
Configure static ip:
<syntaxhighlight lang="bash" line='line'>
sudo nano /etc/network/interfaces
</syntaxhighlight>
Now, paste this under # The primary network interface: <syntaxhighlight lang="bash" line='line'> auto lo iface lo inet loopback iface ens33 inet static
       address xxx.xxx.xxx.xxx(enter your ip here)
       netmask xxx.xxx.xxx.xxx(usually, 255.255.255.0)
       gateway xxx.xxx.xxx.xxx(enter gateway ip here,usually the address of the router)
       dns-nameservers 8.8.8.8
</syntaxhighlight>
Restrat networking:
<syntaxhighlight lang="bash" line='line'>
systemctl restart ifup@eth0
</syntaxhighlight>
At this point you can check if the settings are correct:
<syntaxhighlight lang="bash" line='line'>
ifconfig
</syntaxhighlight>
ROS IP configuration
Run the following commands in the terminal: <syntaxhighlight lang="bash" line='line'>
     cd ~
     pico pengo.config
</syntaxhighlight> Edit the parameters under 'User Settings' to have the same IP as from stage 3:
  * PENGO_IP= YOUR_STATIC_IP
  * PENGO_ROS_MASTER = YOUR_STATIC_IP
Reboot the computer and you're ready.
ROS launch configuration
Navigate to: <syntaxhighlight lang="bash" line='line'>
cd ~
</syntaxhighlight> Run the launch file: Note, there is a 15 seconds delay to assure that all of the configurations are done. <syntaxhighlight lang="bash" line='line'>
. pengo-startup
</syntaxhighlight>
Pengo ROS topics
| Topic | Description |
|---|---|
| /odom | Wheels controller. |
| /scan | Scanning an area. |
| /move_base/goal | Move to a certain target. |
| /mobile_base/sensors/imu_data | Data coming from the IMU sensor.Compass, Accelerometer |
| /agentN/ackermann_cmd | Velocity command |
| /amcl_pose | Absolute position published by AMCL node (localization) |
| /agentN/imu | Compass, Accelerometer |
| /map | A map used for localization |
Mapping and localization with Pengo
To control the Pengo you can use Cogniteam's Android app.
This category currently contains no pages or media.


