Difference between revisions of "Category:HamsterProKit"
| Line 33: | Line 33: | ||
===3. '''Choose which way you want to configure the robot''' === | ===3. '''Choose which way you want to configure the robot''' === | ||
| − | + | * Pre-configuration | |
| + | |||
| + | You need to access your robot with burned image via '''HDMI''' and configure wifi/ethernet settings '''ON ROBOT'''. | ||
Configure your wifi like described below: | Configure your wifi like described below: | ||
| Line 43: | Line 45: | ||
https://wiki.cogni.io/Category:HamsterProKit/EthernetSetup | https://wiki.cogni.io/Category:HamsterProKit/EthernetSetup | ||
| − | '''Note: in both cases you configure [http://wiki.ros.org/Master ROS MASTER], which runs always on robot. In case wifi - available script, Ethernet - instruction manually, follow the links above''' | + | '''Note: in both cases you configure [http://wiki.ros.org/Master ROS MASTER], which runs always on robot. |
| − | + | In case wifi - available script, Ethernet - instruction manually, follow the links above''' | |
| − | |||
| − | |||
| − | + | * Robot environment description | |
ROS1 - melodic provided | ROS1 - melodic provided | ||
| Line 58: | Line 58: | ||
ros melodic workspace - '''hamster_ws''' | ros melodic workspace - '''hamster_ws''' | ||
| − | ros dashing | + | ros dashing workspace - '''hamster2_ws''' |
| − | + | * Run examples | |
Revision as of 15:32, 12 January 2020
Contents
AAEON Pro Kit support page
Kit prerequisite (not included in the kit)
- Lipo battery with T connector 7.4V 2 cell.
- Battery charger
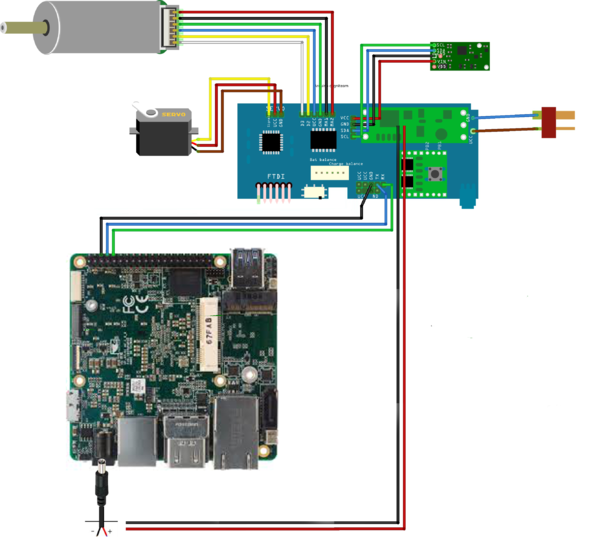
1. Connecting all parts within the kit
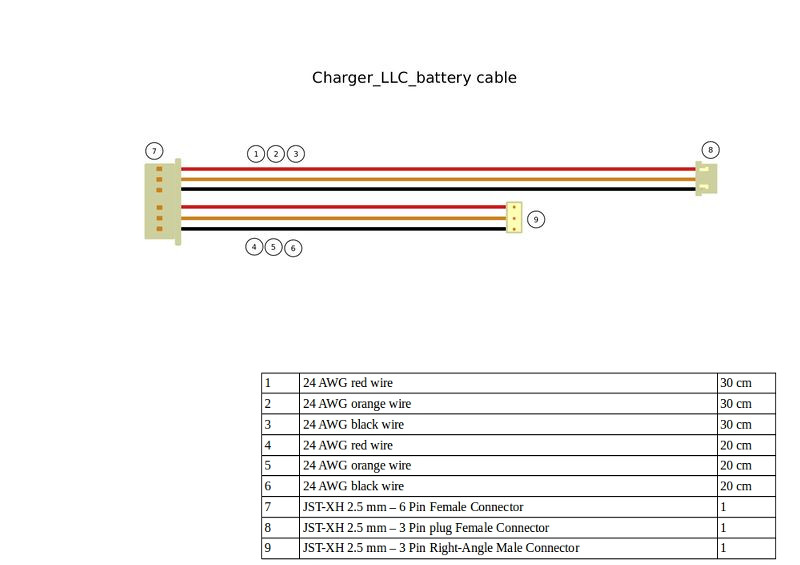
- Use the LLC cable (in the picture) to both monitor and charge the battery
 * Port 9 can be used to charge the Lipo Battery
 * Port 8 should connect the the Lipo battery balancer (JST connector)
 * Port 7 should connect to the LLC board
 * Red T connector (rightmost on the picture)
- Connect the Up Squared board to the LLC as shown in the picture
 * TX/RX should be connected to GPIO ports
 * Power should be connected through DC connector
- Connect the MX2 wifi module
- Connect the two WIFI antennas using the SMT connector to the integrated chip
- Connect the Movidius chip using the PCI connector
- Connect the D435i camera to a USB3 Port using the cable
2. Download the image and burn the image into your robot
Download image:
https://cloud.cogni.io/index.php/s/wEBt55X5qKoV5WN
Burn your image:
3. Choose which way you want to configure the robot
- Pre-configuration
You need to access your robot with burned image via HDMI and configure wifi/ethernet settings ON ROBOT.
Configure your wifi like described below:
https://wiki.cogni.io/Category:HamsterProKit/WifiSetup
or use Ethernet connection:
https://wiki.cogni.io/Category:HamsterProKit/EthernetSetup
Note: in both cases you configure ROS MASTER, which runs always on robot. In case wifi - available script, Ethernet - instruction manually, follow the links above
- Robot environment description
ROS1 - melodic provided
ROS2 - dashing provided
All relative sources are available in .bashrc file, just comment/uncomment required command and executesource .bashrc from terminal
ros melodic workspace - hamster_ws
ros dashing workspace - hamster2_ws
- Run examples
Subcategories
This category has the following 4 subcategories, out of 4 total.

