Difference between revisions of "Category:HamsterProKit"
| Line 32: | Line 32: | ||
* Connect the D435i camera to a USB3 Port using the cable | * Connect the D435i camera to a USB3 Port using the cable | ||
| − | '''Note: Camera D435 must be with updated firmware and calibrated IMU. Visit official site for more information''' | + | '''Note: Camera D435 must be with updated firmware and calibrated IMU. Visit official site for more information.''' |
===2. Download the image and burn the image into your robot === | ===2. Download the image and burn the image into your robot === | ||
Revision as of 13:54, 20 January 2020
Contents
AAEON Pro Kit support page
3rd party things need to know to work with kit
- ROS general information: WHAT IS ROS
- ROS master - what is it? ROS MASTER
- ROS2 general information: ROS2
- RVIZ - instrument for visualization: RVIZ
Kit prerequisite (not included in the kit)
- Lipo battery with T connector 7.4V 2 cell.
- Battery charger
1. Connecting all parts within the kit
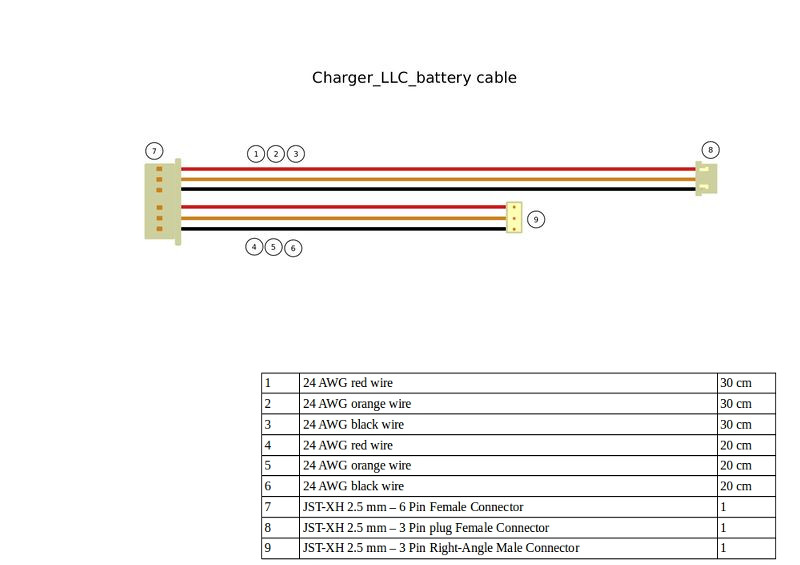
- Use the LLC cable (in the picture) to both monitor and charge the battery
 * Port 9 can be used to charge the Lipo Battery
 * Port 8 should connect the the Lipo battery balancer (JST connector)
 * Port 7 should connect to the LLC board
 * Red T connector (rightmost on the picture)
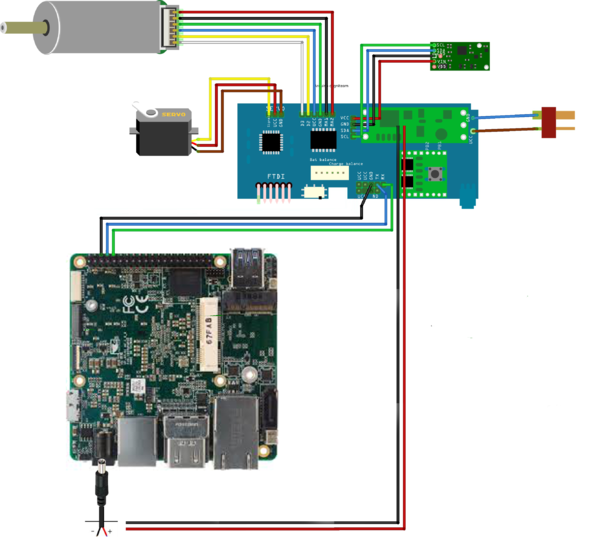
- Connect the Up Squared board to the LLC as shown in the picture
 * TX/RX should be connected to GPIO ports
 * Power should be connected through DC connector
- Connect the MX2 wifi module
- Connect the two WIFI antennas using the SMT connector to the integrated chip
- Connect the Movidius chip using the PCI connector
- Connect the D435i camera to a USB3 Port using the cable
Note: Camera D435 must be with updated firmware and calibrated IMU. Visit official site for more information.
2. Download the image and burn the image into your robot
Download image:
Burn your image:
3. Configure your robot
- ON ROBOT WIFI / ETHERNET
You need to access your robot via HDMI and configure wifi/ethernet settings ON ROBOT.
After configuration you will be able to access your robot through ssh.
Configure your wifi like described below:
or use Ethernet connection:
Note: in both cases you configure ROS MASTER. Links and descriptions above
- ON ROBOT ENVIRONMENT DESCRIPTION AND CONFIGURATION
Each robot should be configured with unique ID.
ID - gives your topics unique prefix - agent* (relevant for ROS1).
Set this name in home directory hamster.config file:
export HAMSTER_ID=agent1
There are two ros distro provided:
ROS1 - melodic
ROS2 - dashing
All relative source commands are available in .bashrc file,
just comment/uncomment required command and executesource .bashrc from terminal
ros melodic workspace - hamster_ws
ros dashing workpace - hamster2_ws
4. Run examples and see output
- I want to run examples and see some output on robot
- ROS1
1. Connect to your robot with HDMI.
2. Uncomment melodic relative rows in .bashrc file below page
3. Save changes
4. Execute source .bashrc from terminal
5. Follow these RUN INSTRUCTIONS
- ROS2
1. Connect to your robot with HDMI.
2. Uncomment dashing relative rows in .bashrc file below page
3. Save changes
4. Execute source .bashrc from terminal
5. Follow these RUN INSTRUCTIONS
- (optionally) I want to run examples and see some output on remote machine
- ROS1 on remote machine
1. Install ROS1 on remote machine
2. Connect to the robot via ssh (if you robot is already configured with wifi - just connect remote machine to access point and make ssh)
3. Run launch commands on robot like described HERE
Note: In case remote machine visualization you don't need to run rviz on robot
4. From remote machine make export to robots' master:
export ROS_MASTER_URI=htts://ROBOT_IP:11311
export ROS_IP=REMOTE_MACHINE_IP
Note: you should do it for each spawned terminal or add this exports to .bashrc file
5. On remote machine run rviz in terminal and make config like HERE
- ROS2 on remote machine
1. Install ROS2 on remote machine
2. Connect to the robot via ssh (if you robot is already configured with wifi - just connect remote machine to access point and make ssh)
3. Run launch commands on robot like described HERE
Note: if you are connected via ssh - rviz, launched on robot, may fall with mistake. Ignore this.
4. On remote machine you can see all available topics with ros2 topic list command
Subcategories
This category has the following 4 subcategories, out of 4 total.

